Online Application Procedures
1.0 How to Apply Online – Creating an account & Login
Welcome to Bishop Stuart University online application system! If you’re a new applicant, follow these simple steps to apply online
Navigate the online application portal via https://apply.bsu.ac.ug
Step 1: On the login page, you’ll find a CREATE button. Click on it to begin your registration.
Step 2: You’ll be presented with a registration form. Please provide the following information accurately:
- First Name: Enter your official first name as it appears on your identification documents
- Last Name: Enter your official surname or family name
- Email Address: Provide a valid email address that you check regularly. This will be your primary communication channel
- Phone Number: Enter your active mobile number with the country code
- Password: Create a strong password (we recommend using a combination of letters, numbers and special characters)
- Confirm Password: Re-enter your password to ensure accuracy.
Step 3: After filling in all required fields, click the CREATE button at the bottom of the form. Your account will be created instantly and you’re ready to proceed!
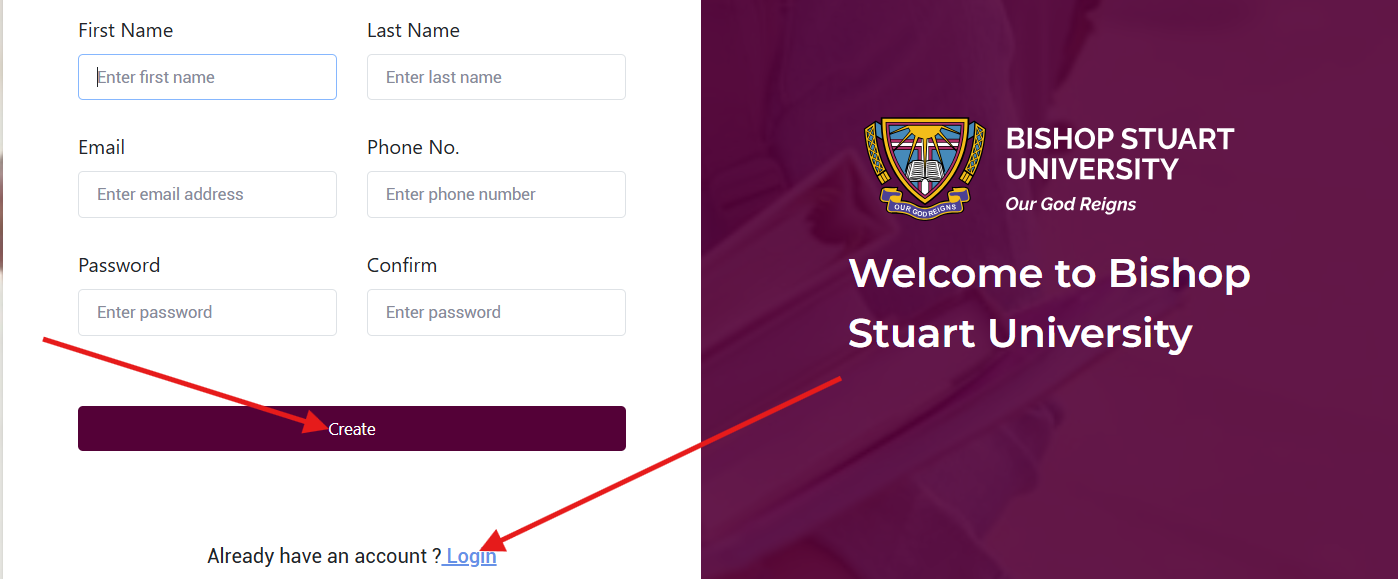
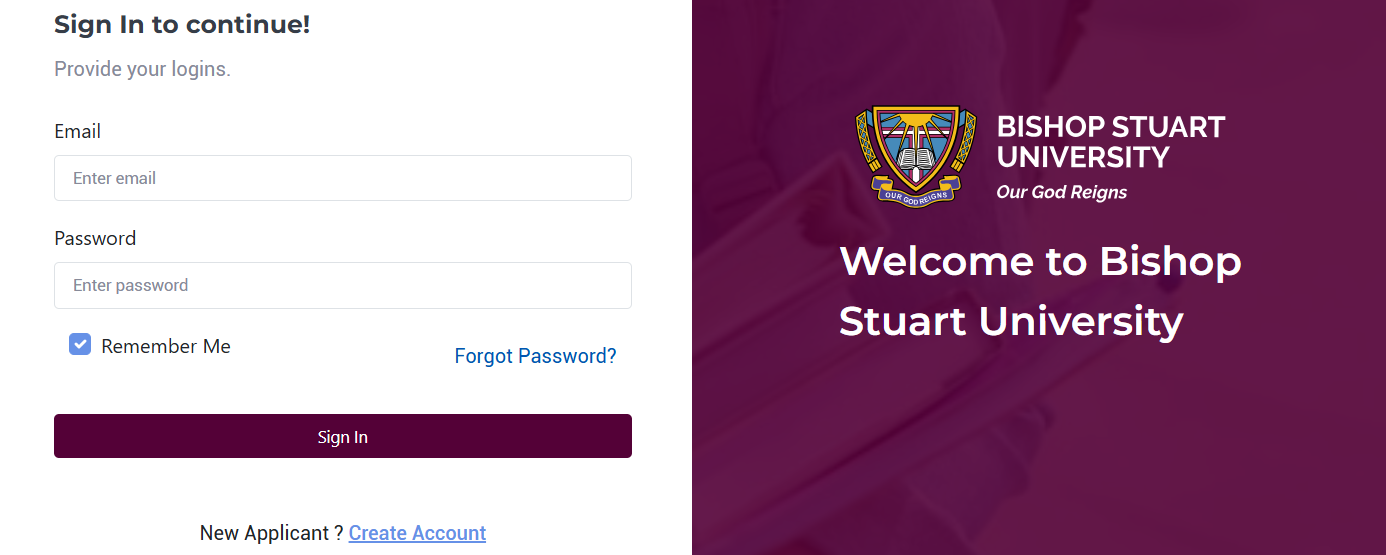
Step 4: Once your account is created, navigate to the login page, enter the email address and password you registered with and then click the Login button. Keep your login credentials secure and confidential. You’ll need them throughout the application process and beyond.
2.0 Understanding Available Schemes
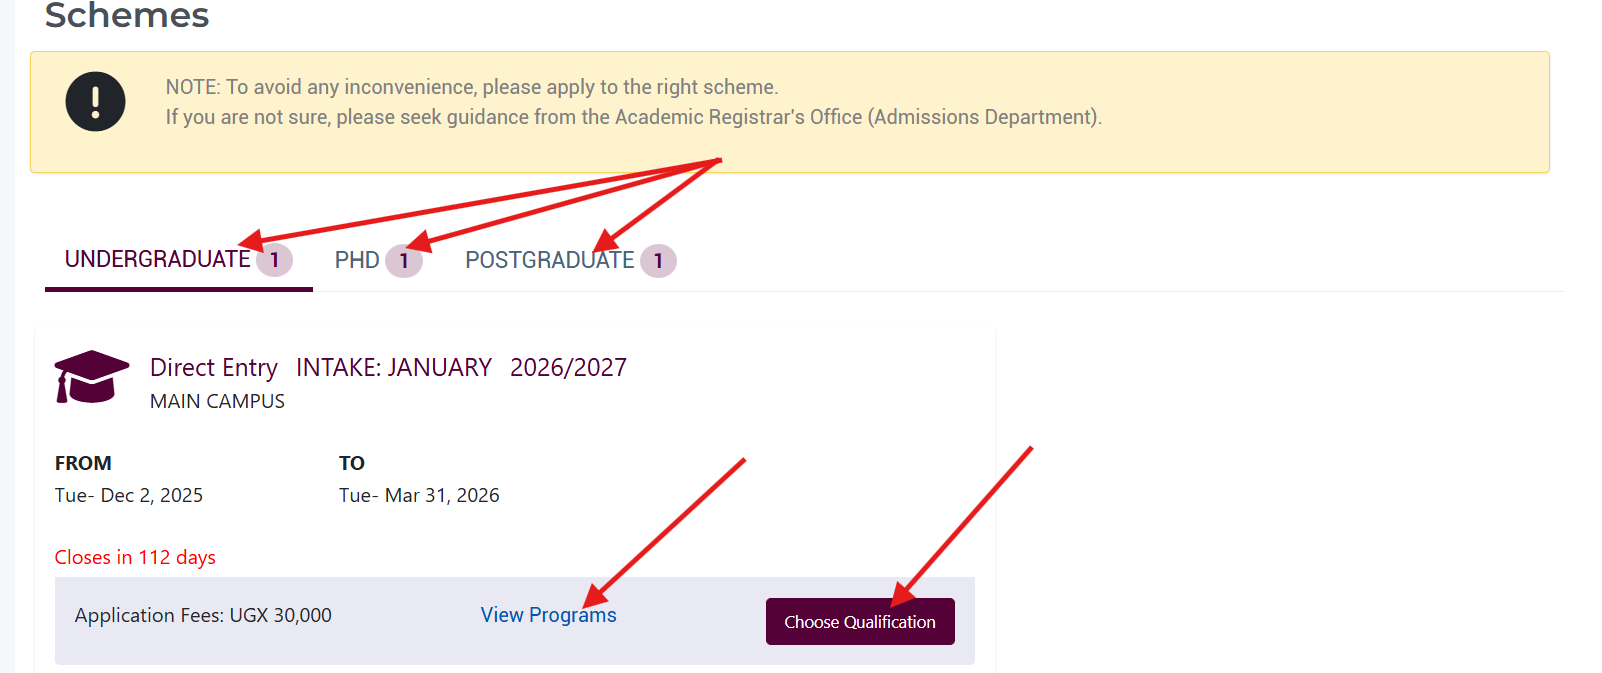
Upon login, you’ll immediately see the currently active admission schemes. Bishop Stuart University typically runs three main types of schemes:
- Undergraduate Schemes: For students pursuing Bachelor’s degrees
- Graduate Schemes: For students pursuing Master’s and Postgraduate programmes
- PhD Schemes: For students pursuing PhD programmes
3.0 What Information Each Scheme Displays
For every active scheme, you’ll see the following details to help you make informed decisions:
- Scheme Name: The official name of the admission scheme (e.g. Undergraduate Day Program)
- Intake & Academic Year: This tells you which semester/intake and academic year the scheme is for (e.g. April Intake, 2025/2026)
- Start & End Dates: Clear visibility of when the application window opened and when it will close
- Days Remaining: A countdown showing how many days you have left to complete and submit your application
- Application Fees: The exact amount you’ll need to pay to process your application
- View Programs Button: Click this to preview all the academic programs available under this particular scheme
4.0 Exploring Available Programmes
Before you commit to applying, we encourage you to explore the programmes offered:
- Click the “View Programs” button on any scheme to browse through the complete list of programmes available
- Review program details, requirements and durations. Take your time to identify which programme aligns with your career goals.
5.0 Starting Your Application
Once you’ve identified your desired programme, click the “Apply Now” button located on the scheme card you wish to apply for.
The critical step is declaring your entry qualification. The system will prompt you to select ONE of the following:
- UCE/UACE: If you completed the Uganda Certificate of Education and Uganda Advanced Certificate of Education
- Higher Education Certificate: If you hold a certificate from a recognized institution
- Diploma in a Relevant Field: If you’ve completed a diploma program related to your chosen course
- Mature Entry Examinations: If you’re applying through the mature age entry route
Important: Your selection determines which forms you’ll need to complete, so choose carefully based on your actual qualifications.
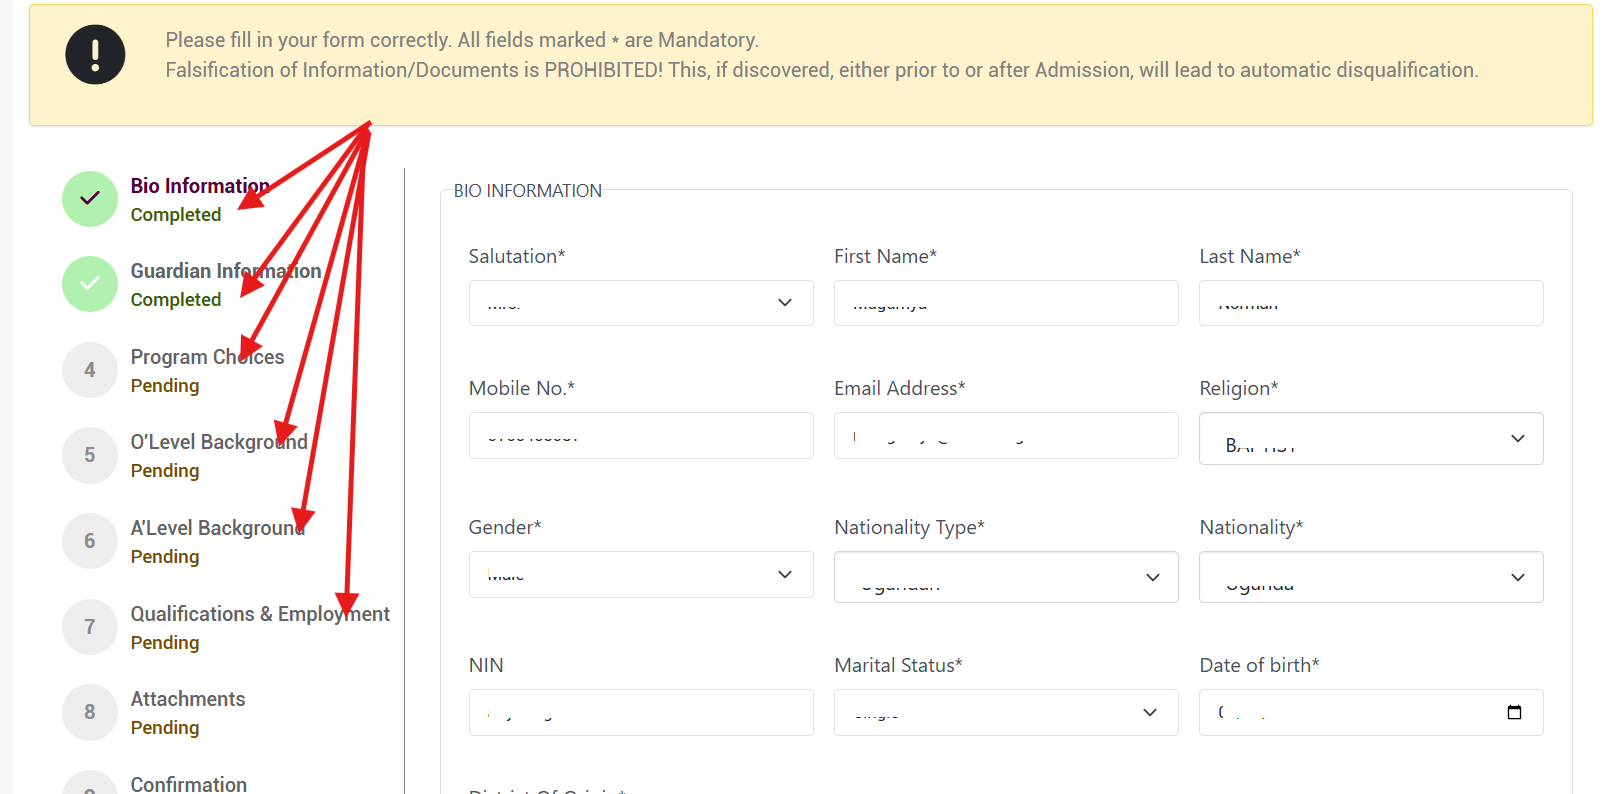
6.0 Completing Your Application Form
After selecting your qualification, you’ll be presented with multiple forms to complete. The exact forms depend on your chosen entry scheme, but may include:
Bio Information Form: This captures your personal details, including Full names and date of birth, Nationality and identification details, Contact information and residential address, Marital status and gender, etc.
Guardian Information Form: Details about your parent or guardian (Names and relationship to you, Contact details, Occupation and address, etc)
Programme Choices Form: Your academic preferences (First-choice program, Second choice program (if applicable), Study mode preferences)
O-Level Background Form For candidates with UCE qualifications (School attended, Year of completion, Index number, Subjects and grades obtained)
Critical Step: When filling this form, you MUST tick the checkbox confirming that you sat for the UCE examination. This is mandatory for the system to accept your form.
A-Level Form For candidates with UACE qualifications (School attended, Year of completion, Index number, Principal and subsidiary subjects with grades)
Critical Step: Similar to O-Level, you MUST tick the checkbox confirming that you sat for the UACE examination before you can proceed.
Additional Forms: Depending on your qualification and program, you may encounter previous higher education details, work experience information, sponsorship details, disability or special needs information, etc.
7.0 Tracking Your Progress
The system makes it easy to know where you stand:
- Completed Forms: Show a “COMPLETED” status with a green indicator
- Pending Forms: Show a “PENDING” status, indicating you still need to fill them out
You can complete forms in any order, but all must be finished before final submission.
a) Saving and Editing Your Work: After filling each form, always click the SAVE button. This ensures your information is stored securely in the system.
b) Editing Forms: You have full flexibility to update your information. Navigate back to any completed form and make your changes. Remember to click SAVE again to update (in case you made changes). You can edit forms as many times as needed before you make your final submission and payment. Once you’ve submitted and paid the application fee, modifications become restricted.
8.0 Previewing Your Application
You’ll have visibility of a generated application letter containing your personal information, programme choices, qualifications summary, date of application, etc.
a) Making Changes: If you notice any errors or want to modify information. Click the “Update” button on the preview page. You’ll be taken back to the relevant forms, make your corrections, save and return to the preview.

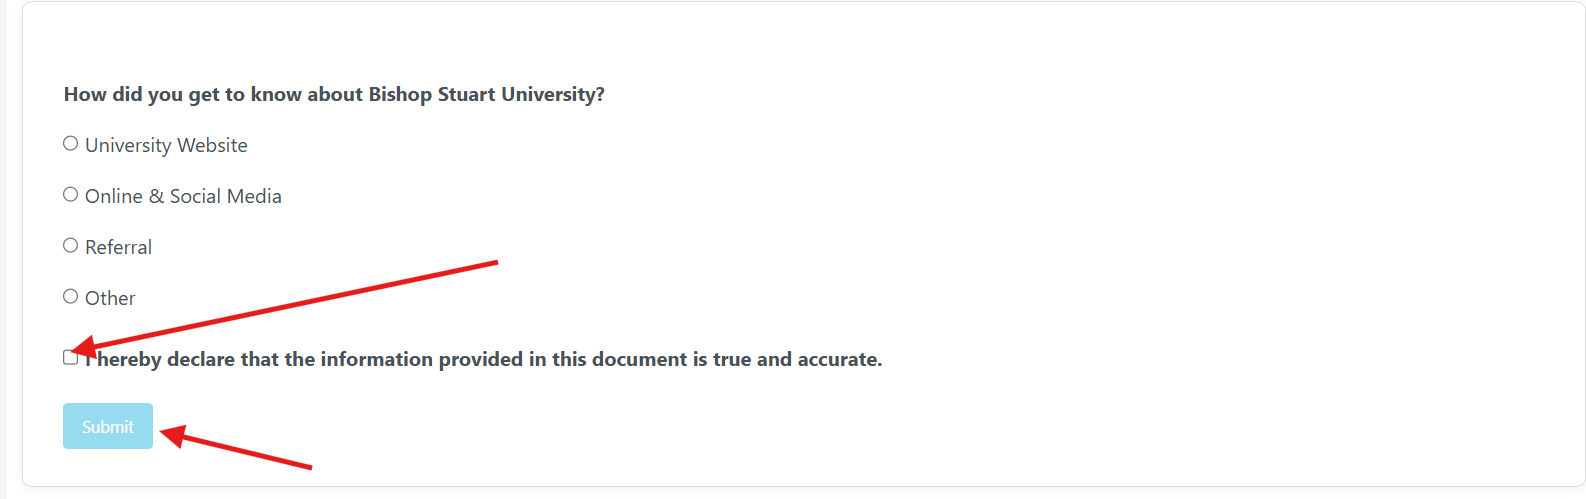
9.0 Declaration & Final Submission
When you’re completely satisfied with your application, carefully review the declaration statement, which typically includes commitments about the accuracy of the information provided, understanding of university policies and acceptance of terms and conditions.
Tick the checkbox to confirm you’ve read and agree to the declaration and then click the “Submit” button.
What Happens Next? Upon successful submission, you’ll receive immediate confirmation (An on-screen message confirming receipt of your application and an email sent to your registered email address). The email will state: “Your Application has been received. Please make the necessary payments and endeavour to keep checking the Application Portal to see the progress of your application.”
10.0 Making Your Application Fee Payment
a) Accessing Your Applications: After submission, you need to pay the application fee to complete the process. Look at your sidebar menu, click on “My Applications”, and you’ll see a list of all your submitted applications.

b) Initiating Payment
- Locate your application in the list. On the right side of each program entry, you’ll see a vertical ellipsis (⋮)
- Click on this icon to reveal a dropdown menu, then select “View Applications” from the menu.
- On the application details page, look at the top right corner. You’ll see a green dropdown button and click it to reveal payment options.
Option 1: Pay Now (Mobile Money)
- Select “Pay Now”. The system will prompt you to enter your mobile money phone number. Enter your number and confirm
- You’ll receive a payment request on your phone. Enter your Mobile Money PIN to authorize the transaction and wait for confirmation
Option 2: Pay Later (Bank Payment)
- Select “Pay Later”. The system will generate a Payment Reference Number (PRN). Write down or save this PRN carefully.
- Visit any authorized banks. Provide your PRN to complete the payment.
- After successful payment, you’ll receive an immediate email confirmation. The email will acknowledge receipt of your payment and your application status will update to “Payment Received.”
Contacts:
If you have any problems regarding the application, please contact the University Academic Registrar’s Office via admissions@bsu.ac.ug, copy helpandfeedback@bsu.ac.ug